---
title: How to Create and Use Medical Templates
description: Medical Templates in Helix allow healthcare professionals to standardize documentation for patient diagnosis and treatment. These templates can be customized with department-specific fields and shared across branches, making it easy for doctors and nurses to quickly fill out relevant medical data. This article explains how to create a medical template and how to use it within a patient’s medical record.
---
[Skip to content](https://help.helixbydoctors.com/kb/how-to-create-and-use-medical-templates-0#main-content)
English - United States
Show submenu for translations

Open main navigation
Close main navigation
- English - United States
Show submenu for translations
- Contact us
Contact us
How can we help you?
- There are no suggestions because the search field is empty.
1. [Helix | Knowledge Base](https://help.helixbydoctors.com/kb?hsLang=en-us)
2. [Control Panel](https://help.helixbydoctors.com/kb/control-panel?hsLang=en-us)
3. [EMR Settings](https://help.helixbydoctors.com/kb/control-panel?hsLang=en-us#emr-settings)
December 16, 2025
# How to Create and Use Medical Templates
## Overview Medical Templates in Helix allow healthcare professionals to standardize documentation for patient diagnosis and treatment. These templates can be customized with department-specific fields and shared across branches, making it easy for doctors and nurses to quickly fill out relevant medical data. This article explains how to create a medical template and how to use it within a patient’s medical record.
#### **Part 1: Creating a Medical Template**
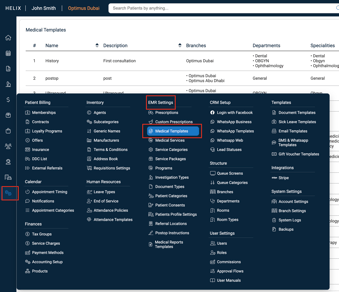
**Step 1: Go to the Medical Template Settings**
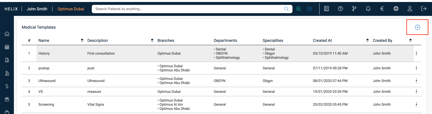
- Navigate to **Control Panel \> EMR Settings \> Medical Templates**
- View existing templates or click the ➕ icon at the top right to create a new one.
**Step 2: Enter Template Information**
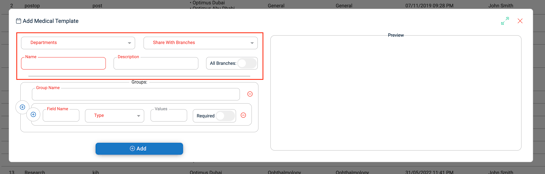
- In the “Add Medical Template” form, fill out:
- **Departments** (where the template will be used)
- **Share With Branches** (choose branches or toggle **All Branches** to make it global)
- **Template Name** and **Description**
****
**Step 3: Add Field Groups**
- Under the **Groups** section:
- Enter a **Group Name**
- Add **Field Names**, select **Type** (Short Text, Long Text, Number, Toggle, Radio buttons, List(single and multi select, Image, etc.), define **Values** if needed, and mark fields as **Required** where applicable.
- You can add multiple groups and fields.
- A real-time **Preview** of your template appears on the right.
**Step 4: Save the Template**
- Click **Add** once you're done.
- The template is saved and becomes available for use by practitioners in the selected departments.
---
#### **Part 2: Using a Medical Template**
**Step 1: Open the Patient’s Medical Record**
- Navigate to a patient record with a service linked to a department that uses the medical template.
**Step 2: Select a Template**
- In the **Choose Medical Templates** dropdown, select the desired template.
- The selected template will appear below with all configured fields.
**Step 3: Fill and Save**
- Enter the medical information directly into the template fields.
- Click **Save** once complete.
- The filled-out template is saved in the patient’s **Medical Record** and **Medical History**.
✅ **Tips**
- Only users with access to control panel & EMR settings (e.g., Admin or Clinical Ops) can create or edit medical templates.
- Templates must be assigned to at least one department to appear in the medical record.
- Toggle **All Branches** to allow cross-branch usability of a template.
- Medical practitioners can only view templates assigned to their department during consultation.
- Don’t forget to hit **Save** after filling in the template — this ensures the data reflects in the patient’s medical history.
- [Getting started](https://help.helixbydoctors.com/kb/getting-started?hsLang=en-us)
- [Home Screen](https://help.helixbydoctors.com/kb/home-screen?hsLang=en-us)
- [Clinical Workflow](https://help.helixbydoctors.com/kb/clinical-workflow?hsLang=en-us#main-content)
- [Administration](https://help.helixbydoctors.com/kb/clinical-workflow?hsLang=en-us#administration)
- [Nurses](https://help.helixbydoctors.com/kb/clinical-workflow?hsLang=en-us#nurses)
- [Consumables](https://help.helixbydoctors.com/kb/clinical-workflow?hsLang=en-us#consumables)
- [Doctors](https://help.helixbydoctors.com/kb/clinical-workflow?hsLang=en-us#doctors)
- [Patient File](https://help.helixbydoctors.com/kb/patient-file?hsLang=en-us)
- [Bookings & Calendar](https://help.helixbydoctors.com/kb/bookings-calendar?hsLang=en-us)
- [Finance & Accounting](https://help.helixbydoctors.com/kb/finance-accounting?hsLang=en-us)
- [CRM & Marketing](https://help.helixbydoctors.com/kb/crm-marketing?hsLang=en-us)
- [Inventory Management](https://help.helixbydoctors.com/kb/inventory-management?hsLang=en-us)
- [Insurance](https://help.helixbydoctors.com/kb/insurance?hsLang=en-us)
- [Control Panel](https://help.helixbydoctors.com/kb/control-panel?hsLang=en-us#main-content)
- [Patient Billing](https://help.helixbydoctors.com/kb/control-panel?hsLang=en-us#patient-billing)
- [Calendar](https://help.helixbydoctors.com/kb/control-panel?hsLang=en-us#calendar)
- [Finances](https://help.helixbydoctors.com/kb/control-panel?hsLang=en-us#finances)
- [Human Resources](https://help.helixbydoctors.com/kb/control-panel?hsLang=en-us#human-resources)
- [Inventory](https://help.helixbydoctors.com/kb/control-panel?hsLang=en-us#inventory)
- [EMR Settings](https://help.helixbydoctors.com/kb/control-panel?hsLang=en-us#emr-settings)
- [CRM Setup](https://help.helixbydoctors.com/kb/control-panel?hsLang=en-us#crm-setup)
- [Structure](https://help.helixbydoctors.com/kb/control-panel?hsLang=en-us#structure)
- [User Settings](https://help.helixbydoctors.com/kb/control-panel?hsLang=en-us#user-settings)
- [Templates](https://help.helixbydoctors.com/kb/control-panel?hsLang=en-us#templates)
- [System Settings](https://help.helixbydoctors.com/kb/control-panel?hsLang=en-us#system-settings)
- [FAQ's](https://help.helixbydoctors.com/kb/faqs?hsLang=en-us#main-content)
- [Appointments & Calendar](https://help.helixbydoctors.com/kb/faqs?hsLang=en-us#appointments-calendar)
- [Reports](https://help.helixbydoctors.com/kb/faqs?hsLang=en-us#reports)
- [Finance](https://help.helixbydoctors.com/kb/faqs?hsLang=en-us#finance)
- [Human Resources](https://help.helixbydoctors.com/kb/human-resources?hsLang=en-us)
[](http://helixbydoctors.com)
[mailto:email@email.com](mailto:email@email.com)
Copyright © 2026, Optimus FZCO
```json
{
"@context" : "https://schema.org",
"@type" : "VideoObject",
"contentUrl" : "https://stream.mux.com/NQ7mzOHeIXMKYlE8GReRm8GR6iA68T4b9YAVixNm00LU/capped-1080p.mp4",
"dateModified" : "2025-07-17T08:03:43.175Z",
"duration" : "PT1M18S",
"height" : 1946,
"name" : "Screen Recording 2025-07-17 at 11.26.41 AM",
"thumbnailUrl" : "https://145820380.fs1.hubspotusercontent-eu1.net/hubfs/145820380/Screen%20Recording%202025-07-17%20at%2011.26.41%20AM.mov/medium.jpg",
"uploadDate" : "2025-07-17T08:03:10.572Z",
"width" : 3418
}
```
```json
{
"@context" : "https://schema.org",
"@type" : "VideoObject",
"contentUrl" : "https://stream.mux.com/SdMJ7DcTr1SA1KwpPxRLJtEk5Ik01p9NgcbnwEy4cQHE/capped-1080p.mp4",
"dateModified" : "2025-07-17T08:44:07.504Z",
"duration" : "PT58S",
"height" : 1946,
"name" : "Screen Recording 2025-07-17 at 12.26.20 PM",
"thumbnailUrl" : "https://145820380.fs1.hubspotusercontent-eu1.net/hubfs/145820380/Screen%20Recording%202025-07-17%20at%2012.26.20%20PM.mov/medium.jpg",
"uploadDate" : "2025-07-17T08:29:21.087Z",
"width" : 3418
}
```